Healthcare Provider Resources
e-Lab Community
Quick Reference User Guide
Cleveland Clinic e-Lab Community is powered by Clinisys Atlas (formerly Sunquest).
This browser-based application securely connects healthcare providers to order tests and review results.
Need assistance? Contact the Reference Laboratory Outreach Group.
Healthcare Provider Resources
Place an Order for a Test
Step 1:
Use the Patient Search to find a patient, then select Create New Order.
Step 2:
Complete all required fields indicated in red.
Step 3:
Select a Test Code, Diagnosis Code, and answer any questions linked to the selected test(s).

Step 1: Patient Search
- After logging in, the Patient Search appears on the screen.
- Search for a patient using their Last Name, First Name, or patient ID
- Select the Magnifying Glass or press Enter to display a list of matching records.
- Select the patient, then select Create New Order.
- Verify that the patient demographics are correct.
- If the patient information needs updates, select the Pencil icon next to the patient’s name to edit the listed details.

Step 2: Order Information
Several fields are automatically populated with data from the patient’s record. Add or modify the information as needed. Required fields are indicated in red.

Step 3: Selecting Test & Diagnosis Code(s)
- Choose a test from the Test Short List, or search for and select a test from the Tests search.
- After choosing the test(s), select Continue.
- Select a diagnosis code from the Short List, or search using the diagnosis code, name, or mnemonic.
- After indicating the code(s), select Continue.
- Note: The Questions section appears if a selected test(s) requires additional information.

Create a New Patient Record
Before creating a new patient record, verify that the patient is new.
- Search for a patient by their last and first name in the Patient Search.
- If no records appear, select Add New Patient.

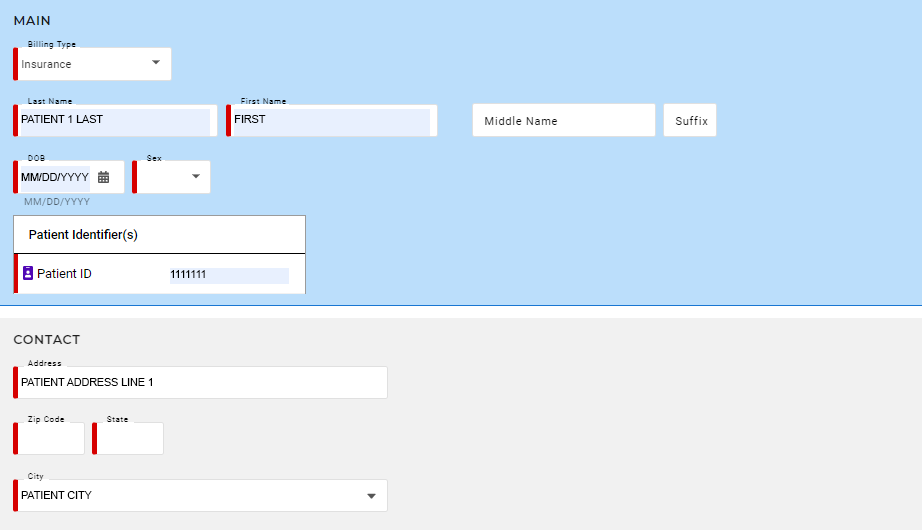
Step 1: Enter Patient Demographic Information
- Select the Billing Type from the dropdown list.

- Fill in all required fields indicated in red.

Step 2: Enter Patient Insurance Information

- Select a Primary Insurance Provider from the dropdown list.
- Enter the Policy Number.
- Enter the Subscriber’s name (Last, First).
- To add a Secondary Insurance Provider, select Add New Provider and enter the secondary insurance information.
- Once the required information is entered, select Save or Save & Continue to New Order.

Report Search
Search by Patient Name
- Type the patient’s name into the Patient Search.
- Locate the correct patient in the results, then select Reports.

Search by Report Details
- Select Reports to open the Report Search.
- Search by Patient Name, Order Number, Accession, Status, Reported, or Resulted start/end date.

- Highlight an order to view:
- Test code
- Test name
- Service provider
- Result name
- Result code
- Resulted date & time
- Result
- After selecting a patient, the following information will display:
- Patient name
- Order number
- Accession
- Collection date & time
- Resulted date & time
- Reported date & time
- Order status

- Select View to create a PDF of the selected order.
- Select Print under Additional Actions to print the report.
Need Help?
e-Lab Community Support
For assistance with e-Lab Community access, contact the Reference Laboratory Outreach Group at [email protected].
Laboratory Questions
For test-related questions, contact Client Services at 1.800.628.6816 – representatives are available 24/7.
